Wednesday, March 2, 2016

The Importance of Self Importance!

So to catch everyone up I have not been on here in a quick minute. Last year was a whirl wind of emotions and big changes in my life. To begin I lost my mom in late February and then 8 months later lost my grandma. Most of you don't know but my grandma had a huge impact on my life so when I lost my mom I immediately turned to her. The woman who raised me for a good half of my life and the woman who showed me what true unconditional love is was my grandma. So when she was diagnosed with cancer in October I was crushed that the next most important person was soon to be in heaven with my mom. In this 8 months I went on a journey, a journey of self discovery. Finding out the true importance of self importance. These two woman in my life were very selfless people, always giving to others and putting others before them selves. I saw the deterioration in their bodies, and self love. Now I don't want anyone to get the wrong picture here, my mother and grandma made great examples of how a mother should love their babies but the truth is they were taken too early and mostly because they didn't put themselves first at times. If they had taken better care of themselves I'm almost positive they would have been around longer than they were. I realized if I want to be around for my daughters and my someday grand babies I should probably start doing two things. 1. Taking care of myself and 2. Letting others know how much I love them by showing them that with my actions. You see when my Mother passed I hadn't talked to her for months, and the last time I had talked to her I knew I should have apologized and just put my pride aside but I didn't. So now I will have to live with that the rest of my life. I know I am human and we make mistakes so I will continue to try and forgive myself because I know that's what my Mom would have wanted, and to grow as a person I knew I would have to learn not only from their mistakes but my own as well. So to the self love part and self importance we should always show ourselves love. Think about it this way if I am always tired and never have a moment for myself how can I give myself completely to my children without being irritable or quick to push them aside when all they want is to tell me about is an episode of My Little Pony or to tell me they created a new club at school with their friends. Some ways I have discovered to show myself love is...


FIND SOMETHING SMALL THAT YOU FIND PLEASURE IN

Such as drinking tea or coffee in the morning and being on social media
Giving yourself a DIY face mask before bed
Painting your nails
It can be anything that doesn't take up too much time but you find simple pleasure in. This will free your mind of any worries or anxieties for that moment and sometimes your brain needs that freeing moment of just not thinking... ya know!

EAT HEALTHY

If we are constantly putting things in our body that don't give us the proper fuel to run how are we supposed to perform at our best. Now this is something new for me and I am trying to make better choices every day, but so far I feel better eating whole raw foods that nourish my body and give me energy to be the best mommy I can be.
Challenge yourself to eat at least one whole raw food meal a day and just see where it takes you! I bet you feel so much better and continue to take the next step to being healthier!

FIND A HOBBY

This can be something you already enjoy doing or something you have been wanting to try.
But you have to give your self one day a week that is designated to that. So when the kids are napping or when your hubby has a day off. That way you can do your thing without worrying about someone elses needs. So for example I like to...
Water color
DIY craft from Dollar Tree
Color in a grown up coloring book lol one that is free of scribbles and tears.
Read a book

BE OUTSIDE

This is so important especially if your a SAHM. It is so important to breath fresh air and be in the sunshine. Nature calms me and I think everyone can use a little outside time.
Whether it's going for a walk to the park
Laying out in your backyard
Gardening


WRITING

This one is the most important I feel. I don't get to it all the time but when I do it makes me feel so much better. Time to reflect and get the negative or positive out. Most of the time I write when I am feeling down because it is therapeutic to me and gives me something to visually look at that is bothering me. I dunno about you but my mind races a million miles per minute. Its hard most of the time to put a finger on just one emotion that I am feeling so writing them down gets them out and frees up my mind for positive and good things. Also sometimes its nice to look back at it to see the progress you have made emotionally.

Well I hope this helps someone  I know this probably isn't the most popular subject for people to read but if it helps just one person out there that would make it worth the writing to me :)
IN LOVING MEMORY OF GLADYS AND DELIA RODRIGUEZ

Wednesday, July 29, 2015

Back 2 School


Summer is coming to an end and although I have had fun not having to wake up at 6 am every morning, I am SO ready for my 7 year old to go back to school. (Don't act like you aren't excited too!) haha! I love my babies and I love being home with them but lets face it having all your kids home at once can take up a lot of your time and energy. I predict I will be getting a lot more cleaning done and errands ran with only having one kid at home during the day.

So let's talk about easing into the back 2 school routines and some helpful tips that I implement into our daily lives. 

1. Start getting the kids back on a sleep schedule.  If you can start 2-3 weeks ahead of when school starts the better. For example my kids have been going to bed around 10 pm all summer so the third week before school bring your bedtime back an hour (So 9pm), the second week before school 8:30 and the last week before school 8pm and by the time they are ready for school they are used to going to bed early. Same with waking up in the morning you have to actually start waking up early! Now moms I know this one kinda sucks for us but in the long run we will benefit greatly :) Same as the night time routine bring back your waking up time an hour, then 30 min more, and so on until you are waking up at your desired time a week before school starts. 

2. Have pre made snacks and sandwiches made a week before you start school. I will be making a ton of PB&J sandies and freezing them! Here is a link to my  DIY Uncrustables, prep any fruit and divide out into baggies making it easier to just grab and throw into lunch bags, same with chips make it easy by having them already put into baggies.

3. Now I have it easy because Gwen's school wears uniforms but either way get your kid's clothes out and ready for the whole week. That means accessories if a girl, socks, and undies. This makes it so much easier and NO ARGUMENTS in the morning about what they want to wear. 

4. Designate an area of your home where they will do their homework everyday. This will give your child less distractions and more guidance on what you expect of them. Have this area ready with pens, pencils, erasers, any kind of item they might need to do all their homework. You can even make a cute caddy like these ones   The idea behind this is that once they sit down everything is ready and there is no reason to leave that spot until homework is finished. 

5. Lastly BE CONSISTENT it might be tough for ourselves to abide by these steps and routines but children really strive with routine and consistency so I promise if you just stick with it you will see amazing results and much more time to go on pinterest and daydream about all the DIY projects you want to achieve this school year! 

What kinds of things do you implement in your school time routine to make your life easier? I would love to hear your thoughts! 

Wednesday, October 15, 2014

Get Granite Countertops for under $100!!! DIY FAUX GRANITE

So we recently started this adventure on updating the house but on a budget and no major renovations. One of the things we're updating are the kitchen counters. I wanted granite badly! But that just aint gonna happen right now lol! So I convinced Tony into letting me paint the counters. Now I know what your thinking, WHAT PAINT!! Yes..... paint the counters but painting them into faux granite. I researched the heck out of it and found a few tutorials out there that I loved and kind of did my own thing. After I showed him all the pictures on pinterest he was sold. But he said this is YOUR project and that meant no help from him. Determined I got my gloves out, bought the paint and went to town. So far the durability has been holding up and I am in love with them. I will say that it was a learning process and there are things I would do differently next time. That is why I would like to share my mistakes so that yours can look even more amazing! Here are the tools you will need.
This is my ugly counter before! 

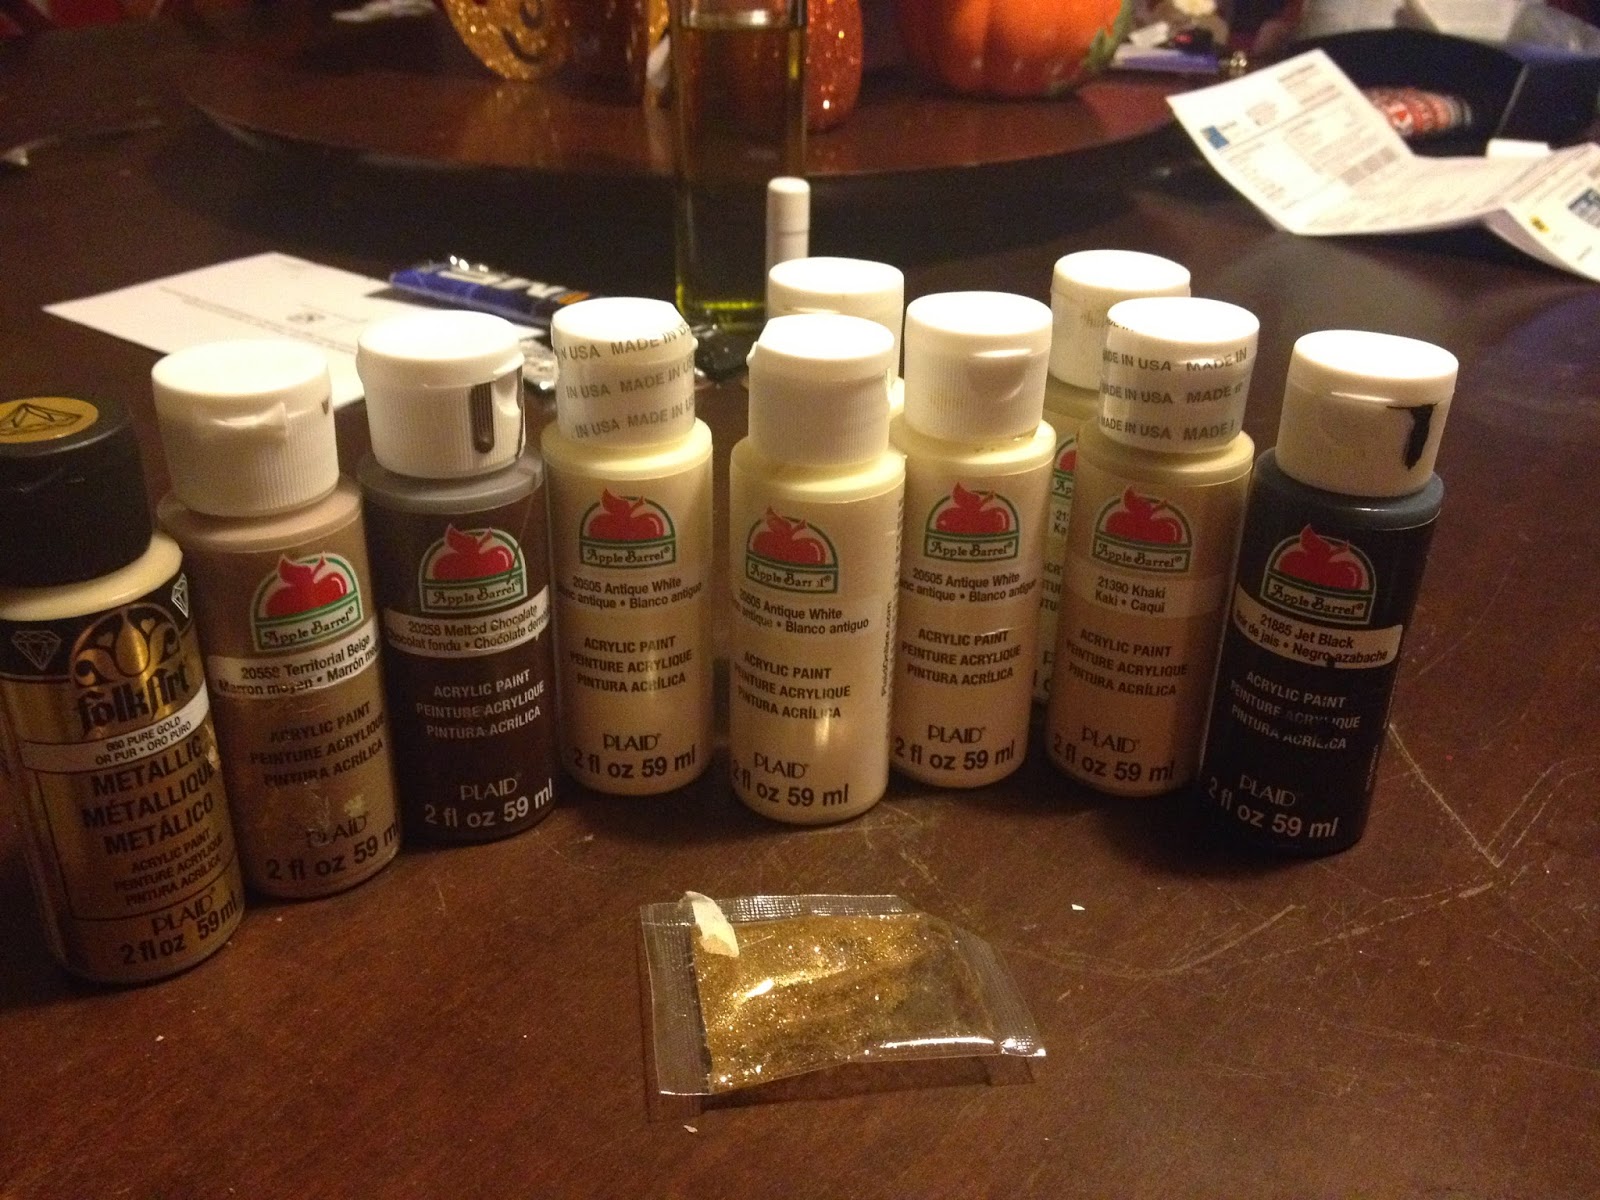
Craft acrylic paint about 5 to 6 colors of your choice. Go to Lowes and look at the granite samples and take pictures of the ones you like and buy your colors according to that. You can find these at Michaels, Walmart, or Hobby Lobby just to name a few.


Next you will need a base paint I used a white base paint bought from Lowes but you could use any extra indoor wall paint you have laying around in any color.


A natural sea sponge, you know the ones that look alive and creepy. Got mine from Walmart in a package of all sorts of sized sponges.
Some crappy craft brushes you can usually find them at the Dollar  Tree in the craft section and come in a big pack. These will be great for getting into the crevices and corners.
Also a thin small art paint brush a decent quality nothing too expensive though.
A paint roller to roll on the base paint.

Painters tape to tape off the wall and appliances and plastic paint drop cloth to tape onto the cabinets I will explain later why you will need it to be plastic. Also your going to want to put some on your floors as well around your working space.

Gloves, it gets super messy with all the sponge painting :)

Glitter is optional or some glitter flecks the ones you add to paint.

Famowood Glaze Coat. It is the crystal clear high gloss finish.


Now lets get into the directions, it may seem over whelming with all the steps I am going to write but the process overall was super easy and actually quite fun. I just want to give you as much detail as possible so you can be prepared and have time to do this. Disclaimer! This is a weekend project it took me all day Saturday and all day Sunday.

Step 1
Prep your surface by cleaning your counter tops really well. Get all the grease and any food stuck on the counter. You want to have a smooth surface so if there is any bumps or flaws make sure to lightly sand those down.

Step 2
Tape off your walls and appliances. Basically anywhere you do not want paint or to ruin the surface tape it off. This is where you are going to need the plastice drop clothes. Next time I do this I will go to the Dollar Tree and get the cheapy shower liners and use those. So I did not have any plastic but I did have this brown paper on a roll so I used this to tape off and cover my cabinets. Bad idea because when you go to put on the top coat it drips off the edge onto the paper and seaps through onto the cabinets. Leaving a sticky residue that WILL NOT come off unless sanded off or used paint thinner. Good thing we are going to restain the cabinets anyways next so I was not too sad about it.

Step 3
This is where it starts to get fun. Paint your base coat all over the counter. I used 3 coats and let them dry for about an hour.


Step 4
Get creative! Start spongeing away with the first color. I started with my lightest color first and then worked my way up to the darkest. Keep a reference picture of the granite you like close by so you can imitate the markings with the sponge and paint brushes. Just keep layering away with all the colors. I found the more layers I used the more dimension and realistic it started to look. The good thing about this project is you can always add more paint layers and cover up what you don't like so just keep playing with it.

This is with the first sponge layer of acrylic craft paint.
Scary looking huh? At this point I was wondering if this
whole thing was a mistake haha!


Step 5
Once I felt I had a good coverage going with all the paint colors. I took a toothbrush and dipped it in the black paint and started flicking the bristles to get that speckled affect all over.
This is after many many layers of craft paint using the sponge and the crappy paint
brushes that I had mentioned.


Step 6
I used the better quality art brush and drew thin lines all over to imitate the cracks that granite has on it. Then I made another layer of sponge painting over them to cover up the harshness of the black and kind of soften it up a bit.
See how harsh the cracks look? That is why I  put another layer of sponge over it.


Step 7
This is when you will want to add the glitter. But this step is optional. Tony told me later on that I should have added more glitter. I KNOW RIGHT! A man saying add MORE GLITTER! LMAO!

Step 8
Make sure to let everything dry very very well! Atleast a couple of hours and make sure it is dry to the touch.

Step 9
Then you will use the Famowood top coat that I mentioned in the beginning. I followed the directions it came with and make sure to read them well. I did not want to mess this step up because after you put this top coat on your work is now permanent! So one tip I strongly recommend is that you use a blow torch to cure this product. I didn't have one so I thought it would be ok, but instead I was left with a ton of air bubbles on my counter. I am going to try sanding this layer a bit and doing one more layer on top of it with a blow torch this time and see if it makes it any better. The last tip I would give you is make sure you get enough of this product to spread evenly on your counters. I barely had enough to cover my counters and I only bought two boxes. After this step let dry for 3 days, that means nothing big like a microwave on it or any water. Now you are finally done and you should have some fabulously frugal granite counter tops!
Your left with shiny new pretty granite counters! 


I must say that at the end of this project I was so proud of myself for accomplishing this project on my own, and I think Tony was pretty impressed too! haha! Thanks so much for stopping by and if you have any questions feel free to leave a comment below! I will try and help you to the best of my ability :)
Much love and hope this tutorial has left you with some extra cash in your pockets!

Wednesday, August 27, 2014

Smooth Mornings with School Aged Children!

So my daughter Gwen is sooo not a morning person! I wonder where she gets it from? (wink wink) She use to cry every morning and then it would frustrate me, and that just aint cool with two non morning people. So I started evaluating where our problems started. She hated getting up early, she was being rushed, having to get her clothes out and then dressed... It was just too all over the place. So I decided for us to establish a routine. First of all kids need adequite sleep. The National Sleep Foundation says school aged children (5-12) need 10 -11 hours of sleep. That is crazy! I didn't know that I always thought 8 hours of sleep was what everyone needed. So we moved her bedtime to an earlier time. I did notice a big difference when doing this just to start off.

The preparation starts the night before when we get everything ready for the next day. That includes her uniforms, shoes and socks laid out, hair accessories, lunch made, and back pack by the door. This helped tremendously because she wasn't fummbling around half asleep in the mornings trying to find everything to get ready. Having everything stream lined I find is the best. The next part of her morning routine was we started with making her bed first before anything. This gives her a fresh clean start to her morning and is a good habit for her to get into for the rest of her life. I dunno bout you but if I walk into my room and the bed isn't made it distracts me and just makes me feel blah! The whole room could be spottless but that alone can make my day come crashing down. So next is brushing her teeth and getting dressed. She then comes to my room where I do her hair and then its down stairs we go. All of this takes her about 30 min. We wake up an hour before we have to leave for school. Giving her ample time to get ready is a very important thing that way she is not feeling rushed and then in turn does not get emotional.

Next is breakfast. Now since I am not a morning person niether I try to make my mornings as smooth as possible too. So the night before I have some preparations that I do to make my mornings go smoothly. I start with loading my keurig with a k-cup, water, and the mug placed underneath. Next some easy breakfast ideas I came up with was making a whole batch of mini pancakes and freezing them so that way I can just pop a few in the microwave for about 45 seconds tada breakfast is ready. I bought cereal bars as well and those are great along with a banana and orange juice. Gwen loves oatmeal so that is another quick microwave option to do on cold mornings with hot coco! She feels all grown up sipping on her coco while she watches her morning cartoons. One last breakfast that is easy and fast to make are smoothies! Just prepackage them in freezer bags and pop them out and toss some OJ in the blender and there you go! Here is a link to one of my smoothie recipes. So while she is eating next is my turn to go upstairs and put myself together.


I have about 20 minutes to do my hair and makeup and throw on something comfy but cute to take her to school. Now, my hair is down to my booty so it's a rare occasion when I actually wear it down and make it all purddy! But here are a couple ideas on how you can still look stylish and put together without having to blowdry, curl, or flatiron your hair.
1. Top knot bun
2. Side braid
3. Side swept low braided bun (Flower Bun)


Next is my go to makeup for the mornings. I have been a makeup artist for over 10 years now and having kids has definetly made me cut down on my face routine. So I use 6 things to do my makeup in the mornings and I keep them all together in a small makeup bag so that way I can easily grab it and not have to fumble through all of my makeup. You can imagine what kind of collection I have going on haha with 10 years of doing makeup! Here is a list of the basics and I will also give you the brands of things I like using.
1. Face primer (Baby Skin by Maybelline)
2. Foundation (Loreal True Match)
3. Concealer (Loreal True Match)
4. Blush/bronzer (ELF duo)
5. Eyebrow pencil (Avon brow pencil)
6. Mascara (Falsies by Maybelline)


Then my alarm for 7 am goes off and it's off for school!

In conclusion ROUTINE is the key here! Being prepared the night before, having a set routine and ample amount of time gives for a smooth morning with your cranky lil ones. Hope this has helped some of you be inspired to bring some routine into yours and your kid's life!
Much love mamasitas until next time!

Wednesday, August 20, 2014

I know I know!


I am soooo sorry for being away for a little bit school started for my six year old! ugh! I can't believe she is in 1st grade now! I know everyone says time goes by fast but it really does. I can remember the day I brought her home from the hospital like it was yesterday and now she is in first grade all independent walking herself to class now :( BIG SAD FACE!! Any ways thought I would give you all my links to my social media come check them out. I am always posting new stuff all day, like dollar tree hauls and random pics of my babies.

Instagram
Facebook
Twitter
Pinterest

She cray cray!


Instagram

Sunday, August 10, 2014

Dollar Tree Recipe 30 Minute Meal for $4

So this recipe is soo fast and easy to make, so yummy that I have made it twice already! My house we have two adults and two kids and we still have left overs the next day. Everything I bought was from the Dollar tree, although you could buy any of this stuff at your choice of store and use different brands as well. Also you can add meat to yours but I try to incorporate no meat meals in our weekly rotation because it's cheaper. I first saw something like it from a youtuber britneyandbaby check her out her family is  super cute!


Ingredients
Your choice of noodles
1 jar of alfredo sauce
1 jar of spaghetti sauce
Your choice of shredded cheese
Have no idea why this picture won't turn the way I want it to!


First set your oven to 350 degrees and put your noodles to boil. While that is boiling I usually shred the cheese or get my daughter to do it :p You're going to want your noodles cooked al-dente because they will cook some more in the oven. Once they are cooked drain and return the noodles to the same pot. Next add the alfredo sauce straight into the pot with the noodles and stir it together. Next you want to dump all the noodles into a casserole dish. Top the noodles with the spaghetti sauce and make sure it is evenly distributed. Add cheese all over the top and put in oven for about 20 min. or until cheese is melted through.
Step 1
Step 2 
Step 3

Step 4

Step 5

Step 6


That's IT!!!! In 30 minutes you have a yummy meal!
This whole recipe costed me $4 
Also if you would like to add some garlic bread to your meal they sell this at the Dollar Tree as well.

Happy eating chicas!

Saturday, July 26, 2014

YOU KNOW YOUR SHORT WHEN...

Have you ever wondered what it would be like if your were short? Now I don't mean like where you have to get on your tippy toes to reach a cup in the upper cabinets. I mean short to where you're climbing the counters just to reach a cup on the first shelf of the cabinet! This sort of thing is normal for me at any given day you could be visiting my house and you might just see me climbing the counters like a damn monkey lol! Hey sometimes I'm too lazy to go get the stool haha!

You know your short when your grocery shopping and you're having to climb into the fridge isle just to get the milk on the top shelf.

You know your short when you have to cut a good 6 inches off of your jeans just so you can wear them without dragging all over the dang place.

You know your short when you're checking out at the register and they think your just a kid.

You know your short when your shoes and some of your clothes come from the kid section.

You know your short when your 6 year old daughter is just about the same height as you. 

My mother and my younger brother who happens to be over 6 ft!

Grandpa, me when pregnant, and mom! Short genes run in family!
You know your short when your changing your laundry load over and your whole body is half way in the dang washer to reach the last sock at the bottom.

You know your short when the seat in your car is pushed all the way up and you still have to put wooden blocks on your pedals.

These things are the norm for me, a lot of people ask me are you a midget? Well lets start off with the proper terminology. Midget is used as a derogatory term, and most short people prefer not to be called that. I personally prefer little person. There are many types of little people just to name a couple there is achondroplasia and pseudoachondroplasia. The fact is we are just like everyone else we work and have families, and live life just like normal sized people. We just have to do things a little different. I guess the reason why I am writing this is a lot of people aren't educated on the subject and might poke fun or call names. When I was a kid it was tough because let's be honest kids can be mean! I mean brutal! Now that I am an adult it's really no big deal and I don't have to deal with all of that but I do worry about my Lola growing up and kids judging her for her height. I know that she will grow up and be a strong woman for everything she will go through growing up tiny. You tend to grow some tough skin and soon you stop to notice the people staring and pointing at you all together. But the truth is that once you get to know me I am just like every other mother out there just might have to climb a few counters a day to get those bottles down :)
Here is a picture of Tony and I look how tiny I am compared to him :)

Lots of people ask me do you wish you were taller? and I say "NOPE" I love being short! And that's that!

Tuesday, July 15, 2014

Try It Tuesday

Hello everyone! I have an awesome post today and have been so eager to share this with you! I recently posted some pictures on my Instagram, it was  my chair cushions before and after pics and a lot of people were wanting to know the DIY recipe! Let me say that this is life changing haha! The great thing about this recipe you can make a big batch of it and store it in any container! Let me jump right in with the before and afters so you can see what we are working with here.
This is the before! YUCK! These were given to me.

AMAZE BALLS! After my DIY stain remover!
So as you can see the difference is amazing! Although you can still see a little bit of that big stain from before I still think the difference is like night and day.
WHAT YOU WILL NEED
1. Peroxide
2. Dawn dish soap (Blue kind)
3.Baking Soda

Directions
Start off by mixing two parts peroxide and one part Dawn. Mix thoroughly but don't make it sudsy. Then add in just enough baking soda to make the mixture a creamy consistency. That is it girlies! So simple and easy, you can save the rest of your mixture in a dark colored container preferably. The peroxide reacts to light exposure so should be kept in a dark bottle or jar. 

How to Use
Put mixture onto stain and scrub with a toothbrush or one of those scrub brushes used for dishes. Leave on for 30 minutes and check back with it. If needs more scrubbing do so and let sit for an additional 30 minutes. I let mine sit for an hour and scrubbed every 30 minutes. After your 30-60 minutes is up wash clean with water and VOILA! You should have a stain free product! This is especially great for those bib stains from formula or breast milk. 

I hope this tutorial has helped some of you! I was so happy to have found this recipe on pinterest. I plan on doing more tutorials in the future so look out for those :) 
From one momma to another have an amazing day! And may it be filled with stain free laundry! 

Friday, July 11, 2014

Easy and Cheap Organizing "Dollar Tree"


I recently started on an organizing binge! Do you guys do that? I just get into these kicks and start organizing EVERYTHING! I'm sure Tony is used to it by now, he comes home and things are put in a different place almost every day. I think my inspiration this time was Jennifer from organized like Jen on youtube. I came across her channel and I was like "Uhm I have to organize NOW!" haha! Seriously you have to go check out her channel. She has amazing tips and I think she might be one of the most organized people in the world LOL. https://www.youtube.com/organizedlikejen here is the link to her channel. DISCLAIMER (Only start watching her channel if you have like five hours to just be addicted and binge out on her channel) Just sayin! So with that being said, I embarked on an adventure of organizing my home. I started with something easy and little. I suggest doing something small to start off with because you don't want to get overwhelmed or better yet discouraged. Everything I purchased was from the Dollar Tree and for each cabinet under the sink I spent about $3-$5. In my opinion that's a great deal!
Kitchen Sink Cabinet

As you can see I have 3 containers all from the Dollar Tree. Starting from left to right the first square bin has all of my everyday cleaning stuff such as counter sprays and dish detergent. Next square bin has dusters, sponges, and clothes. Lastly the red basket with handles is my bathroom cleaning caddy. My thought behind this when I purchased it was I could easily take it into all the bathrooms when cleaning. All of this storage costed me just $3! Hell yeah! :)

Downstairs Bathroom

This cabinet I have those same two red bins from the kitchen I loved so much. I purchased these from the Dollar Tree.   Back left bin has all of my extra lotions and soaps. When I Have family stay I have extra lotion, shampoo and toothbrushes that they can use. The left red bin has mouthwash and flossers for easy availability and also some of Gwen's hair ties and brushes so that I can do her hair in the morning for school while she is eating breakfast. You can see in the front left I have Cinderella flushable wipes and sanitizer. I am potty training my one year old at the moment, I do plan on doing a whole post on early potty training soon. I'm currently perfecting the whole thing right now. Whole cost of this cabinet $2 cha ching!
Girl's Upstairs Bathroom

So this bathroom is for my girls. Gwen is the only one who currently uses it so it has only her things in it currently. From left to right I have these pink bins that I purchased at the dollar tree when I was pregnant with Gwen so they are like 7 years old but they have held up great, so I use them still. First bin has her bath stuff and extra lotions. Next is her hair combs, brushes, and hairspray. Does your 6 year old do her own hair and come down with like a million clips in her hair! I die every time she comes to me and is like "Look mommy don't I look pretty!" haha anyway... the little chevron cases are awesome and I got these at the dollar tree a week ago! I grabbed the last 2! If you would have seen me it was like I had struck gold. People probably were looking at me funny! Both of those hold hair ties, bows and tons of clippies. It would have costed me $4 but because I already had the two bins grand total for this sink $2!


Master Bathroom Vanity

So let me first start by saying this is not my favorite set up. But it works! It's somewhat tidy and neat with some function. I had bought these turquoise woven material baskets at the Dollar Tree probably about three years ago. So I use them for now until I know exactly what I want to do with this sink. In the back left I have a huge pile of hot tools and hair dryer. I could probably toss out most of the hot tools but you just never know what you might need haha! In front of that the square basket has my hair things next to that you can barely see it but there is a clear long plastic rectangle filled with all of my hair clips I make. Would you guys like a post on how I make these? Let me know in the comments if that's something you would like to see. Next I have in the back right corner my first aide basket with all of my Band-Aids  and things fro boo boos! In front of that is same basket filled with a butt load of lotions and oils. Hey a girl never knows what kind of mood they will be in so you have to have options! :p Technically I only paid $1 for this cabinet but including the baskets I spent $4! 

So there you have it! You don't have to spend a ton of money on things to be organized! I spent a grand total of $13 for all of my sink organizing! The Dollar Tree is the hot spot to meet all of your organizational needs!
Until next time mamasitas lots of organizing your way!
XO, 
Chantil


Sunday, June 29, 2014

Red White N Blue Smoothie

HAPPY 4TH OF JULY

I absolutely LOVE making smoothies! There are unlimited combinations and the kids love them as well. I decided to share a festive smoothie that we have been loving in our house lately! 
INGREDIENTS YOU WILL NEED
Frozen Strawberries
Frozen Blueberries
Banana
Coconut Water 
TRY TO USE LOCAL ORGANIC INGREDIENTS

THIS IS MY FAVE COCO H2O

Start by adding the frozen fruit first. I always fill it to about halfway in the blender. Next add your banana, and then fill your blender to about halfway point again with coconut water. Blend away and enjoy! I love this combination and is very festive for the 4th of July! A couple of tips on making smoothies. I always buy the fresh berries when they are on sale and buy a butt load of them! Then wash and freeze them in ziploc freezer bags. That way you are not spending a lot of money on fruit that isn't in season and at a fraction of the cost! Also adding bananas makes your smoothies very creamy and a thicker consistency. Lastly try adding kale or spinach you can't even taste that it's in there and you get a boost of iron and fiber. So go out and try out some fun combos and maybe give this recipe a try as well! Let me know what you think of it :) Everyone have a fun and safe 4th!
Till next time MAMASITAs... lots of fireworks and sunscreen your way!

Wednesday, June 18, 2014

Luau Summer BBQ!! ON THE CHEAP!

So summer is here and all I can think about is BBQ's, swimming, and long nights by the fire pit roasting smores. I was at the dollar tree and saw all of the amazing luau decorations and it sparked a creative flare in me! My mother's birthday was coming up and I was ready to throw an awesome luau but on the cheap (My favorite). I'm going to break it down for you what I spent and maybe inspire you to go out and throw your own fabulous party! To start I pretty much bought everything at the dollar tree so that helped, and seriously guys you can find soooo much there!
Things I bought at Dollar Tree
Glow in the dark sticks
Leis 2 packs
Hula skirt
Coconut bra
Wall Decorations 2 Packs
Chinese Lanterns 4x
Pink flamingos 2x
Grass skirt door decoration
Hawaiian Balloon weights 4x
Total Cost under $20

Things I already had on hand
Streamers in assorted colors
Glass vases to display things 
Some colorful twirly decorations to hang from ceiling
Total Cost FREE
Food On the cheap
Hotdogs (Bar S Brand On sale $1 each)
Buns ($1 each pack)
Condiments (Free already had)
Chips and Dip ($4)
Homemade fruit tray watermelon and pineapple ($5)
Homemade veggie tray carrots, 3 rainbow bell peppers ($3)
Hummus to dip (2 for $3)
Lemonade and Ice tea  to make Arnold Palmers ($4 for both)
Total Cost around $25 with tax
Here are some pictures so you can see what we did to make it festive looking on the cheap!

 This whole wall was created with streamers and just taped down the shape to the wall. Then added some birds and flowers from the Dollar Tree.


 Glow sticks for the kids! 

Rainbow streamers for the entry way!

I made this tiki mask cake with a box of yellow cake mix and 1 container of white frosting and then just used food coloring for the different colors! I used watermelon and blueberries and pineapple for the eyes and mouth. 

So go out and be inspired to be festive and have fun this summer on THE CHEAP!